Hardware Issues
(10.02) Bandwidth
Why do pages load slowly? Data travels through a series of wires as patterns of electrical signals represented as binary digits (bits). Bits indicate whether the electrical state is on (1) or off (0). Eight bits are needed to make a single letter of the English alphabet. Bandwidth is measured as the number of bits a wire can transmit in a second.
Standard 56Kbps modems can transfer a maximum of 56,000 bits. While that may sound like a lot, most people don’t realize they share bandwidth with their neighbors. As more people attempt to access the Internet on the same bandwidth, the actual transfer rate is reduced significantly. So a 50K page may seem like it should load in less than a second, if 10 people access similarly sized pages simultaneously, that same page will take more than 10 seconds to transfer.
As a designer, while you can’t control the physical connection, or how many people surf at the same time, you can control how large your pages are and ultimately, how much bandwidth they require. This is the age old dilemma to designers: having to make tradeoffs between size, speed and quality. Use the following chart to compare typical connection speeds to help you in your design.
Connection Comparison Cable
- Relatively inexpensive to install
- Not widely available
- Relatively expensive monthly fees
- Shared last mile bandwidth
- Restrictions on use
DSL
- Dedicated last mile bandwidth
- Not widely available
- Expensive to install
- Relativley expensive monthly fees
ISDN
- Dedicated last mile bandwidth
- Expensive to install
- Expensive monthly fees
Dial-up
- Relatively inexpensive monthly fees
- Relatively inexpensive to intall
- Ties up phone line, or requires a second line
- Lost connections and servers often unavailable due to having more customers than IP addresses.
- Shared last mile bandwidth
- Restrictions on use
Satellite
- Good option where cable and DSL are not available
- Requires no wiring
- Expensive to install
- Requires satellite dish with clear line of sight to satellite
- Relatively expensive monthly fees
- Subject to weather conditions
(4.20) Resolution
Monitors, and images, consist of tiny dots, or picture elements (pixels) laid out in a grid pattern. Resolution refers to the tightness of the grid or how many pixels fit in an inch; and how large the viewable area is, or how many pixels the grid contains both horizontally and vertically.
PPI
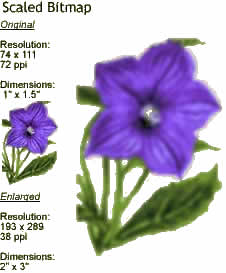
The tightness of the grid or its pixels per inch (ppi) is an issue that eludes many beginning Web designers, particularly those coming from print media. A designer will take an image prepared originally for the printer and attempt to adapt it for the Web and is appalled at the resulting image that looks nothing like its original. What happens? Simply stated, printers can print in a grid that is far tighter than the average monitor can display. While an inkjet printer can easily print an image at 300 ppi and a laserjet at 1200 ppi, the average monitor can only display at 72 ppi.
Total resolution
Visible space on the monitor or its total resolution dictates how many pixels it can display horizontally and vertically. To put this into perspective, compare an inkjet with your monitor. An inkjet supports 300 ppi and an 8-1/2 x 11 inch visible area. Translated to total resolution, you can safely print an image that is 2250 pixels wide by 3000 pixels high, allowing for a ½ inch margin all the way around.
The average monitor, on the other hand, can only display resolutions of 640 x 480, 800 x 600 or 1024 x 768 (and higher). Now, take away all the toolbars, menus and other objects that occupy much of this space, and you end up with a relatively small area in which to display your image.
It’s also important to remember when you’re planning your design that image resolution and bandwidth are directly related. Each of the pixels in a color image contains 24 bits of data. The image produced for the inkjet described above would thus be 162 million bits (2250 x 3000 x 24)! And on a 56 Kbps connection would take over 48 minutes to arrive, if no one else is on the same bandwidth!
(n/a) Bit-depth
Bit-depth, or the number of colors the monitor is capable of displaying, is another video concern. A single bit equals two colors with older video displays only able to display 8-bit or 256 (2x2x2x2x2x2x2x2) colors. While high-end systems are capable of displaying the full RGB spectrum at 32-bits or 16.7+ million colors, a 32-bit image could not be viewed on anything but a system that can display in 32 bits. The following shows the relationships between current video technologies and number of colors.
Video and Image bit depth:


-
32-bit 16.7+ million colors + an 8-bit grayscale mask
-
24-bit 16.7+ million colors
-
16-bit 65.5 thousand colors
-
15-bit 32.8 thousand colors
-
8-bit 256 colors
-
7-bit 128 colors
-
6-bit 64 colors
-
5-bit 32 colors
-
4-bit 16 colors
-
3-bit 8 colors
-
2-bit 4 colors
View/Edit Video Resolution and Bit-Depth
Right-click on the desktop and choose Properties. Click the Settings tab and experiment with the color and resolution choices.
All image editors fall into two basic categories: paint programs and drawing programs. To grasp the difference between these, first think of yourself as an artist commissioned to paint my portrait. You would start with a blank canvas, a palette of colors, various sized brushes and other tools, and a visual perception of what I look like. From start to finish, you base your creation on your perceptions of what you see.
Now consider yourself an architect whom I’ve hired to plan and draw my dream house. After obtaining my list of needs and wants, you would start at a drafting table with rulers, compasses, calculators and other precision instruments. Although you can incorporate your artistic style into certain aspects of the design, the house must be structurally sound and mathematically precise.
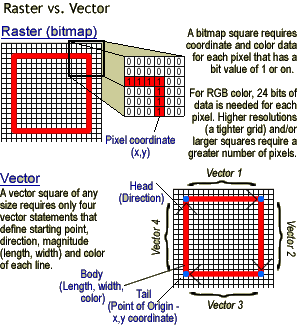
Whether you’re an artist or an architect determines which imaging software you would use to produce graphics on a computer. Artists need paint programs that produce raster images consisting of pixels, or picture elements. Think of a raster as a grid of horizontal and vertical (x,y) coordinates. A raster image file identifies which of these coordinates to illuminate. If this is sounding suspiciously like the pixels in your monitor, you’re right.
Your monitor is a raster display device. As your computer renders a raster image onscreen, it maps each bit to its corresponding colored pixel at the appropriate grid coordinate. Thus, we commonly refer to raster images as bitmaps. The bitmap format has two serious drawbacks for use on the Web: 1) it produces file sizes that exceed the bandwidth of most Web connections; 2) it is not easily scalable.
You can determine a bitmap’s file size as follows: [pixel width x pixel height x bit-depth] / 8. Recall that bit-depth is how many colors are in your image. In addition, since one bit can be one of two possible states, on or off, a single bit can also represent two possible colors. For example, if I have a black and white image, which has a bit-depth of one (two colors), and it is 300 x 300 pixels, its size is: 300 * 300 * 1 / 8 = 11,250 bytes. Contrast the size of the same image, only this time in 24-bit RGB color: 300 * 300 * 24 / 8 = 270,000 bytes. Such an image would take approximately 39 seconds to display on a Web page using a 56Kbps modem.
The second drawback of bitmaps is scalability. You may have realized by now that bitmaps are dependent on your screen resolution. More specifically, their size and quality are dependent on the ratio of pixel width to pixel height and to the number of pixels per inch. If you try to enlarge a bitmap simply by changing its dimensions, you’re forcing the same number of pixels to fit in a larger space. Ultimately you’ll end up with a blurry, unsightly image you won’t want to share with anyone.
03.20 GIF
There is a wide variety of raster and vector formats in use today. Only two raster formats, the Graphics Interchange Format, or GIF (pronounced gif or jif), and Joint Photographic Experts Group format, or JPG (pronounced jay-peg), have full support on the Web. Each of these formats uses a special compression technique to reduce file size and maintain optimal quality. Knowing which one to use for which types of images is key to producing high quality, fast loading Web pages.
The GIF file format is best suited for line art, cartoons, schematics, and images with areas of solid color. A GIF image is limited to 256 colors, and more specifically to the Web-safe palette. GIF uses a lossless compression scheme; meaning that quality is only lost during the initial conversion to GIF, and only if your image exceeds the 256-color limitation or departs from the Web-safe palette. Current GIF specifications come in three varieties: animated, transparent and interlaced.
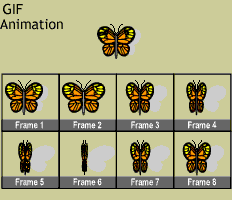
GIF Animation: An animated GIF consists of multiple GIF images in a single file that play sequentially in rapid succession creating the illusion of motion. In ImageReady and Fireworks, you can easily create an animation similar to the butterfly by creating each image in its own frame. The browser will then display each frame in sequence. Optionally, you can set the speed at which the browser switches from one frame to the next, called frame delays, and set how many times it should play the whole series of frames, called looping.
Because a GIF animation contains multiple images, you need to keep it small to stay within bandwidth limitations. Each frame adds significantly to the time it takes to display the image, so you should carefully consider how many frames are necessary to accomplish the desired effect. Look at the butterfly again, each frame weighs in at about 1.5KB (kilobytes), so with eight frames, the entire image is about 12KB.
It’s important not to confuse GIF animation with Flash animation referred to in the last chapter. GIF is a raster format that has become a universal standard supported by all browsers. It is also readable and editable using most image editors. Flash is a proprietary vector-based program in which you can produce animated videos. Currently, browsers can’t display Flash videos without the help of the Flash player that Macromedia kindly lets you have free.
GIF Transparency: In addition to animation, however, the GIF format supports transparency. All raster images, because of their bitmap nature, are rectangular. Transparency allows you to choose colors in your image you want the browser to ignore, thereby allowing the page background colors to show through instead. For example, look at the two frog animations. I set the top one with a transparent canvas so the page background colors show through. The bottom image is not transparent, so the canvas color causes the image to appear as a rectangle.
03.25 JPG
The JPG file format is best for photos and continuous tone images. This format handles solid color poorly and does not support animation or transparency. The good news is you are not limited in your color choices and can prepare a photo for the Web with all of its 16.7 million colors in tact.
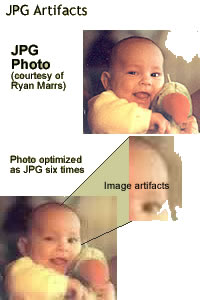
JPG uses a lossy compression scheme that reduces the file size by removing the most insignificant colors. This stripping of colors happens every time you optimize a JPG as a JPG. So, if you do so repeatedly, you will eventually end up with imperfections, known as artifacts, resulting in a ghastly image that has lost all of its color.
PNG
Although GIF and JPG continue to be the standards for the Web, a new contender, the Portable Network Graphics format, or PNG (pronounced ping), deserves special mention. Endorsed by the W3C, the PNG format uses a variation of the GIF lossless compression scheme. The difference between PNG and GIF, however, is that your browser decompresses a PNG image when it displays it, resulting in no loss in quality.
You can also create and store PNG images in any bit-depth. Unlike GIF images that can hold no more than 256 colors (8-bit) or JPG images that can be stored in no fewer than 16.7 million colors (24-bit), PNG images can be stored in 8-bit, 24-bit, or even 32-bit. The downside of the PNG format is it doesn’t support animation and because of its complex nature, it is a difficult format to program for, thus it hasn’t gained wide support on the Web yet.
Format Comparison
The comparison chart will help you choose your image formats wisely. Being familiar with the different compression strategies (i.e. lossless for GIF and lossy for JPG), will help you choose the best formats that minimize bandwidth needs and maximum image quality.
Right-click on the top left image and choose properties.
Examine the file format.
Repeat steps 2 and 3 for each of the images.
Click on each of the images to view full size.
What conclusions can you reach?